
Part 2: How to work with SQL queries as a pro
🌟 Documentation, Code Review and SQL Style Guide


This is the second part of our big post on working with SQL like a pro written together with Dmitry Anoshin, an experienced data engineer and creator of Surfalytics community.
Part 1: How to work with SQL queries as a pro. 🛠 CI/CD, Git, Version Control and Creating your first Pull Request
Documentation and Onboarding
Nowadays, every data team I was working require some kind of onboarding. Imagine, you are getting new laptop and you have to connect all the existing services.
There are many ways of organizing onboarding documentation such as welcome emails, confluence page, TODO lists and so on. But when we talk about code and applications that are require to use IDE it is better to keep everything close to the code itself. In case of GitHub we should aim to readme.md files and try to describe the onboarding process. Moreover, in case of of updating any code in repo we can update the onboarding guide.
Let’s check the quick example of Markdown document and highlight simple Markdown syntax:
# Welcome to the Data Analyst Team!

Welcome to our team! This guide will help you get started with your role as a Data Analyst. Below you'll find essential information, resources, and tools to ensure a smooth onboarding process.

## Table of Contents

1. [Introduction](#introduction)
2. [Tools and Software](#tools-and-software)
3. [Data Sources](#data-sources)
4. [Best Practices](#best-practices)
5. [Useful Commands](#useful-commands)
6. [Contacts](#contacts)

---

## Introduction

As a Data Analyst, your role involves interpreting data, analyzing results, and providing insights to help make informed business decisions. You'll work closely with various departments to understand their data needs and deliver actionable reports.

## Tools and Software

Here are the primary tools and software you'll be using:

| Tool          | Purpose                                | License     |
|---------------|----------------------------------------|-------------|
| **Python**    | Data analysis and scripting            | Open Source |
| **SQL Server**| Database management and querying       | Commercial  |
| **Tableau**   | Data visualization and dashboarding    | Commercial  |
| **GitHub**    | Version control and collaboration      | Free/Paid   |
💡 Full is available on our GitHub

This is just random example of onboarding guide but it is showing how readme.md is powerful and should be incorporated into your data team culture.
💡Check out this Markdown Cheat Sheet
History of changes
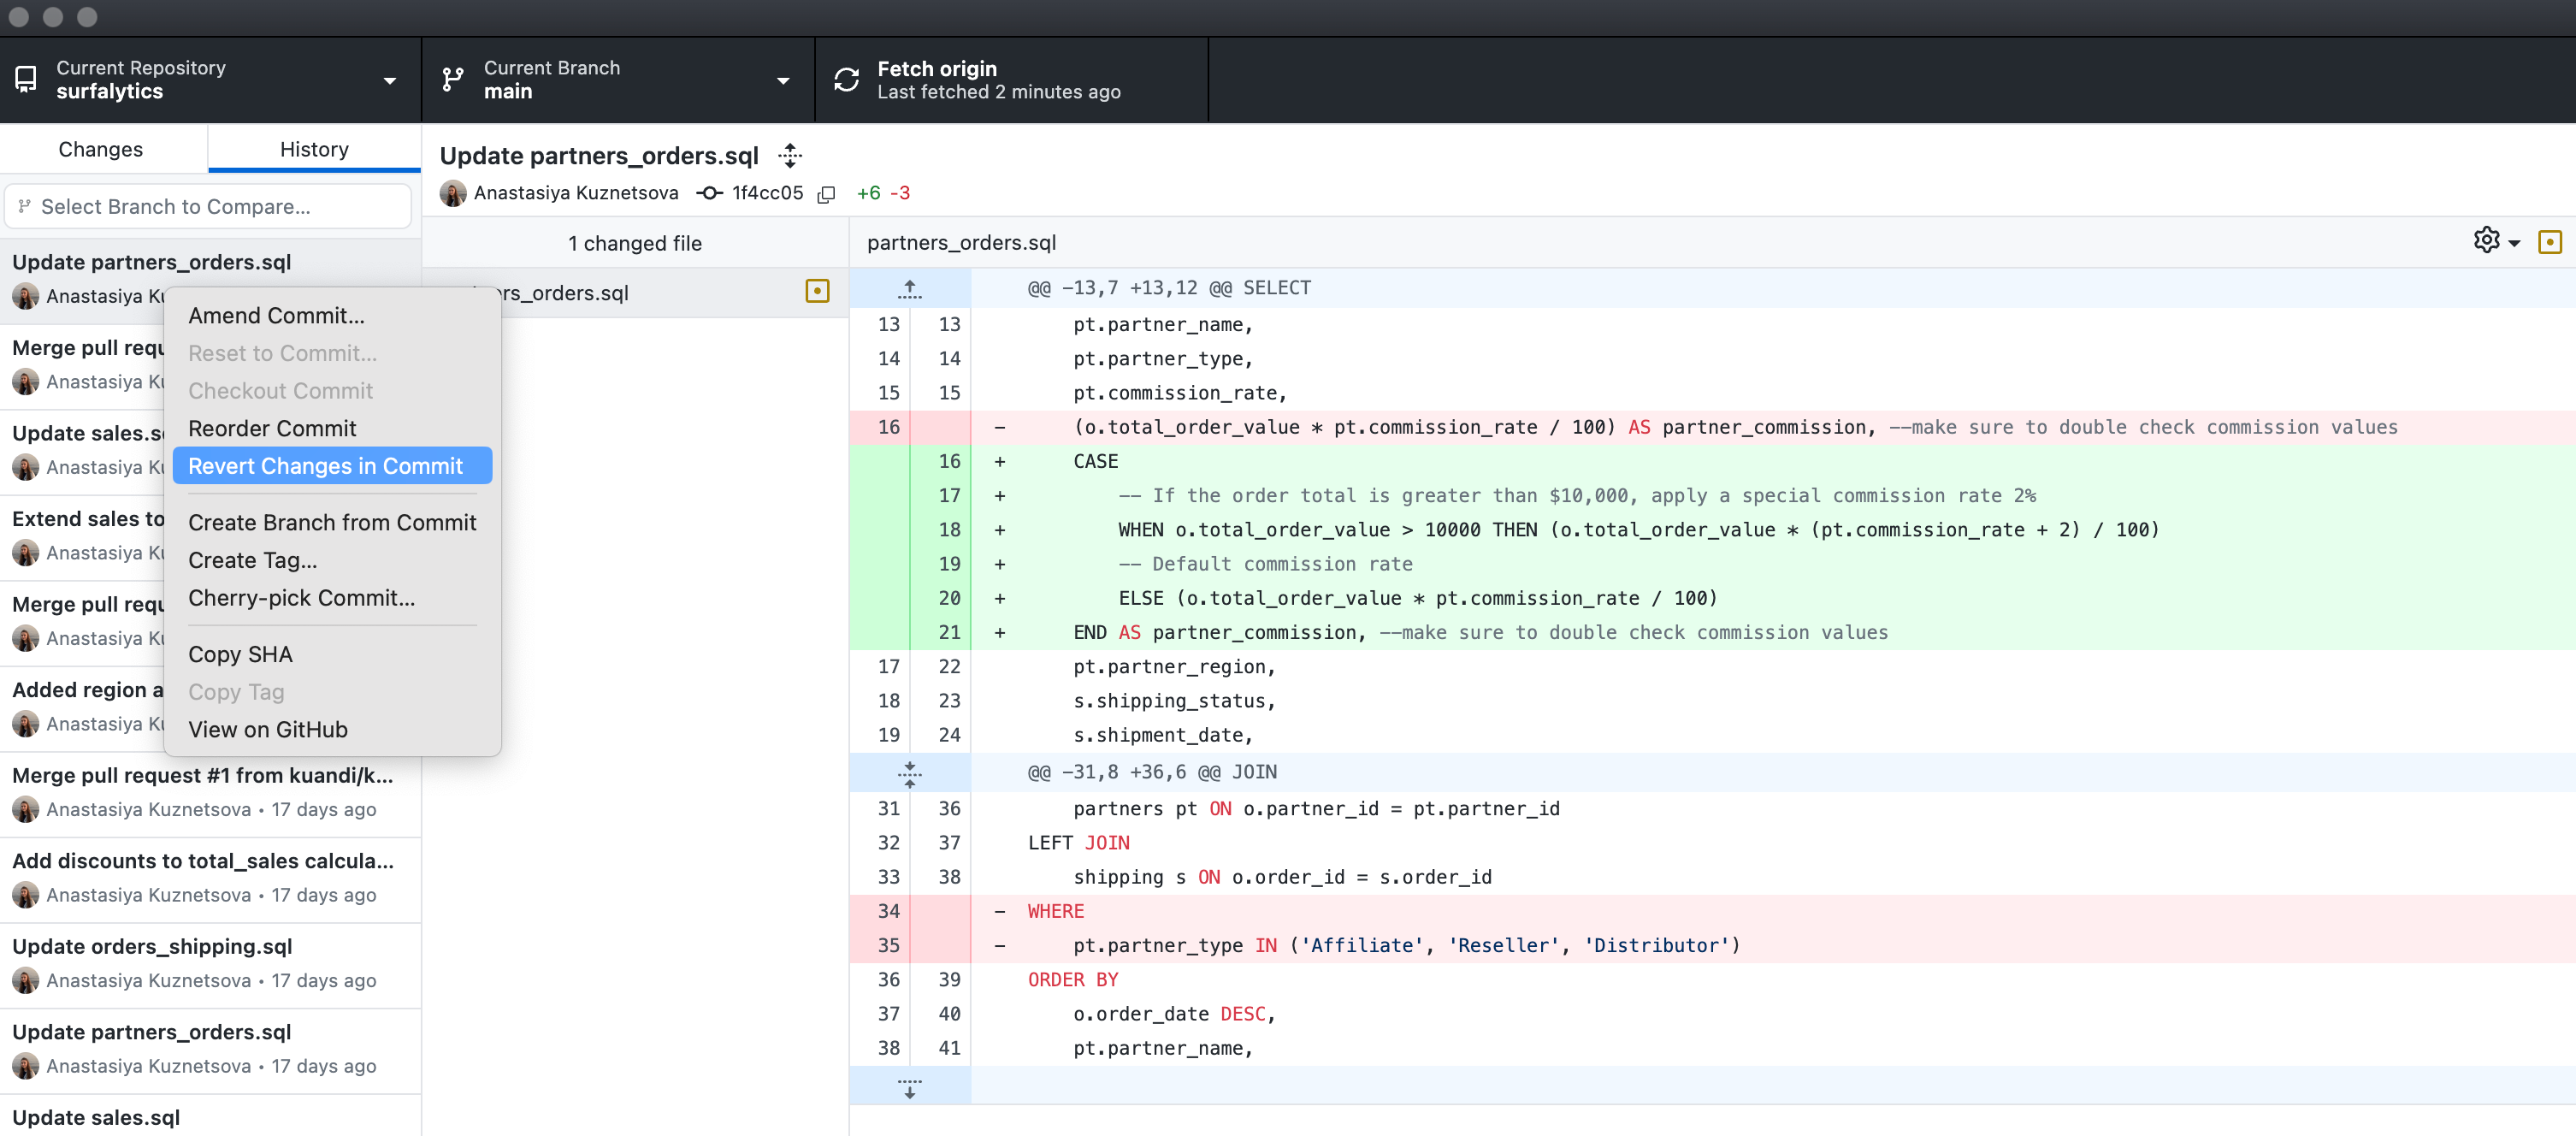
Since primary responsibility of git systems is version control, you can always find details about changes in your SQL, Python code, documentation and so on.
At any given time you can pull history of changes and optionally travel back to any changes in the past.
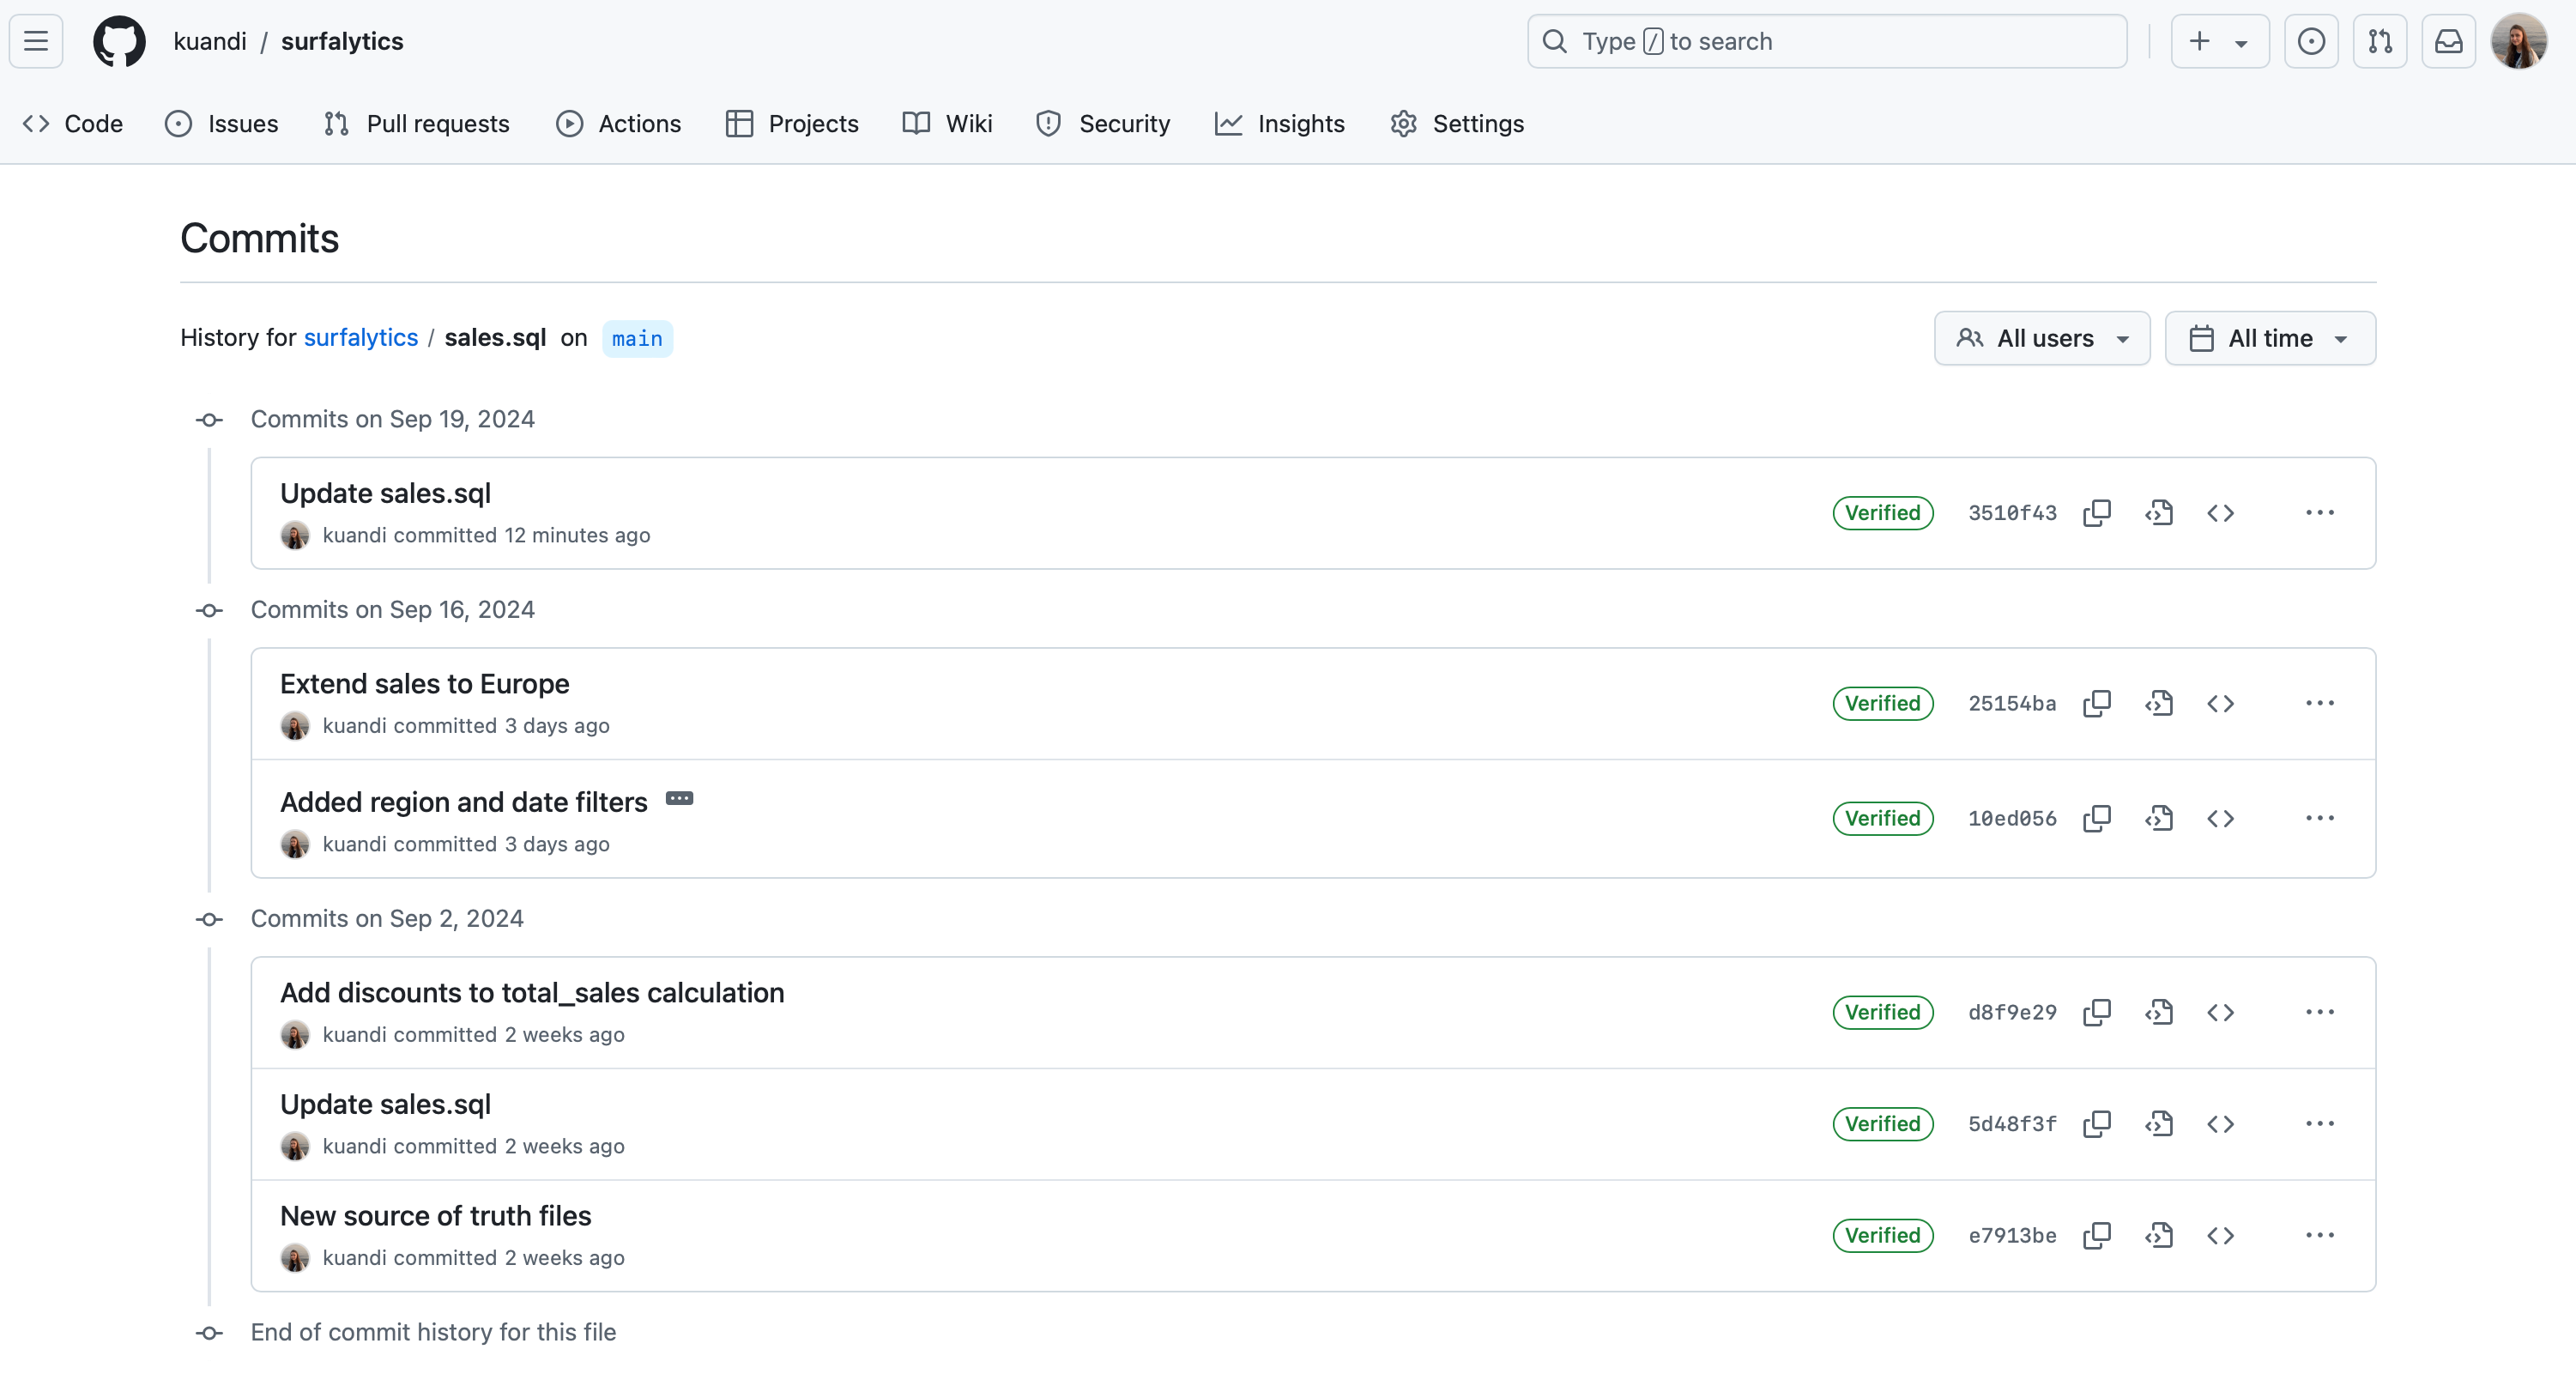
Imagine, analyst submit a code and accidentally missed filter conditions in WHERE condition. You would be able to find the change and revert the change:
Code Review
We already mentioned the case when analyst submitted (merged) the code into production (main branch) with wrong condition. To avoid this behaviour we should leverage code review process.
First of all, we should configure the repo to not allow to merge into main branch (sometimes master ).
Shift from “Master” to “Main” in Git Repositories
The transition from “master” to “main” as the default branch name in Git repositories is driven by a move towards more inclusive and culturally sensitive language in the tech community. The term “master” has historical associations with slavery and oppressive language, prompting organizations to adopt “main” to foster a more welcoming environment.
It worth to mention about overall idea of development lifecycle with git systems.
Assume, you have a GitHub repo with the code and you want to implement changes to the existing SQL code.
1. Clone the Repository Locally
Start by cloning the remote repository to your local machine. This creates a local copy where you can work on the project.
git clone <https://github.com/username/repository.git>2. Create a New Branch
Creating a new branch allows you to work on changes without affecting the main or production branch. This is essential for organized and parallel development.
git checkout -b feature/your-feature-name3. Make Changes and Test Locally
Edit the codebase as needed. After making changes, ensure you thoroughly test them to confirm everything works as expected.
4. Commit and Push Changes to Remote
After testing, commit your changes with a meaningful message and push the branch to the remote repository.
git add .
git commit -m "Add feature: describe your feature"
git push origin feature/your-feature-name
Difference Between Local and Remote Repositories
Local Repository: This is the version of the repository on your personal computer. You can make changes, create branches, and commit code locally.
Remote Repository: This is the version hosted on platforms like GitHub. It serves as the central repository that team members collaborate on. Pushing your changes updates the remote repository, making your work available to others.
5. Create a Pull Request (PR)
A Pull Request is a way to propose your changes to the main codebase. It allows team members to review, discuss, and approve your changes before they are merged.
Pull Requests (sometimes Merge Request) is a key element for ensuring code quality, knowledge sharing and overall sign of quality work. It allows team members to review the code and ask questions, offer improvement.

Code Quality
In data analytics code quality = quality of insights and decisions. Code quality includes many aspects such as naming standards, documentations, tests and so on. The code review is final step where human is involved before the code will deployed into the production.
Obviously, human factor is not reliable and usually more than 50% of data issues are happening due to human factor. That’s why we want to add checks that will enforce automatically different kind of checks including code linting, units tests and so on.
Before bother our busy colleagues with code reviews we should make sure we don’t have silly mistakes and our code looks good.
pre-commit is great options to leverage different kind of checks (hooks) to review our code that we want to commit. It is quite simple to add to your repo. For example, you can install pre-commit:
pip install pre-commitand place the .pre-commit-config.yaml file in root directory:
# .pre-commit-config.yaml

repos:
  - repo: <https://github.com/pre-commit/pre-commit-hooks>
    rev: v4.4.0  # Use the latest stable version
    hooks:
      - id: trailing-whitespace
      - id: end-of-file-fixer
      - id: check-yaml

  - repo: <https://github.com/adrienverge/yamllint>
    rev: v1.26.3
    hooks:
      - id: yamllint
        args: [--config-file=.yamllint.yaml]

  - repo: <https://github.com/sqlfluff/sqlfluff>
    rev: 0.24.0
    hooks:
      - id: sqlfluff
        args: [--dialect, ansi]  # Adjust dialect as needed
        files: \\.(sql)$

  - repo: <https://github.com/pycqa/flake8>
    rev: 6.0.0
    hooks:
      - id: flake8
        additional_dependencies: [flake8-docstrings, flake8-bugbear]

  - repo: <https://github.com/psf/black>
    rev: 23.9.1
    hooks:
      - id: black
        language_version: python3.11  # Adjust to your Python version

  - repo: <https://github.com/pre-commit/mirrors-mypy>
    rev: v1.4.1
    hooks:
      - id: mypy
        additional_dependencies: [types-requests]  # Add any additional type stubs as needed

  - repo: <https://github.com/pre-commit/mirrors-eslint>
    rev: v8.48.0
    hooks:
      - id: eslint
        files: \\.(js|jsx|ts|tsx)$
and install hooks locally:
pre-commit run --all-files
It gives us many benefits:
Automated Code Quality Checks: Ensures that code meets defined standards before it’s committed.
Consistent Codebase: Maintains uniformity across the codebase, making it easier to read and maintain.
Early Error Detection: Catches syntax errors and potential bugs early in the development process.
Enhanced Collaboration: Facilitates better collaboration by enforcing agreed-upon coding standards.
For example, this is light weight example of committing
git commit -m "Adding Net Suite Sales"
trim trailing whitespace..........................................Passed
fix end of files..................................................Passed
check yaml........................................................Passed
check json....................................(no files to check)Skipped
check for added large files.......................................Passed
prettier..........................................................Passed
The nice thing of pre-commit that it tryes to fix the code for you.
CI/CD
The final piece of this process is automatisation. It is all nice to have but we want to make sure it is running remotely automatically equally for all users.
Let’s check what is CI and CD and how it can help us.
Continuous Integration (CI) is the practice of automatically building, testing, and validating code changes as they are integrated into the main codebase. For SQL code tasks, CI typically involves:
Linting SQL Scripts: Ensuring that SQL code adheres to coding standards and is free of syntax errors.
Running SQL Tests: Executing unit tests or integration tests to verify that database changes work as expected.
Validating Schema Changes: Checking that schema migrations do not introduce conflicts or issues.
Continuous Deployment (CD) automates the process of deploying validated code changes to production or other environments. For SQL code tasks, CD involves
Applying Database Migrations: Automatically executing SQL scripts to update the database schema or data.
Versioning Database Changes: Keeping track of different versions of database scripts to manage rollbacks if necessary.
Creating Releases: Packaging and distributing the database changes as part of a software release.
Using GitHub we can create GitHub Actions for CI/CD.
Let’s start from example Workflow for CI. This workflow performs the following steps whenever code is pushed or a pull request is created:
Checks out the repository.
Sets up Python (required for pre-commit and SQL linting tools).
Installs dependencies.
Runs pre-commit hooks to lint and validate code.
Runs SQL-specific linting and tests.
# .github/workflows/ci.yml

name: CI Pipeline

on:
  push:
    branches:
      - main
      - 'feature/**'
  pull_request:
    branches:
      - main

jobs:
  build:
    runs-on: ubuntu-latest

    steps:
      # 1. Check out the repository
      - name: Checkout Repository
        uses: actions/checkout@v3

      # 2. Set up Python
      - name: Set up Python
        uses: actions/setup-python@v4
        with:
          python-version: '3.11'  # Adjust as needed

      # 3. Install dependencies
      - name: Install Dependencies
        run: |
          python -m pip install --upgrade pip
          pip install pre-commit
          pip install sqlfluff flake8 black mypy  # Add other dependencies as needed

      # 4. Run pre-commit hooks
      - name: Run Pre-commit Hooks
        run: pre-commit run --all-files

      # 5. Run SQL Linting with SQLFluff
      - name: Lint SQL Files
        run: sqlfluff lint ./sql  # Adjust the path to your SQL files

      # 6. Run SQL Tests (Optional)
      - name: Run SQL Tests
        run: |
          # Example: Execute SQL test scripts
          # Replace with your actual test commands
          bash ./scripts/run-sql-tests.sh
Explanation of Workflow Steps:
Checkout Repository: Uses the actions/checkout action to clone your repository into the workflow.
Set up Python: Sets up the specified Python version required for running linting tools and pre-commit hooks.
Install Dependencies: Installs pre-commit and other necessary dependencies like sqlfluff, flake8, black, and mypy.
Run Pre-commit Hooks: Executes all pre-commit hooks against the entire codebase to ensure code quality.
Lint SQL Files: Specifically lints SQL files using sqlfluff to enforce SQL coding standards.
Run SQL Tests: (Optional) Executes SQL test scripts to validate database changes. Replace the example command with your actual test commands.
In simple words, CI is a process that we want to run after we create a commit or Pull Request, before we invite colleagues for Code Review.
In our example, we are adding same pre-commit checks that we had locally. This will help to avoid cases when developers didn’t follow onboarding guide and missed the step to setup pre-commit locally.
Let’s check the CD example. This workflow deploys SQL changes to the production database whenever a commit is merged into the main branch or a new release is created.
# .github/workflows/cd.yml

name: CD Pipeline

on:
  push:
    branches:
      - main
  release:
    types: [published]

jobs:
  deploy:
    runs-on: ubuntu-latest

    steps:
      # 1. Check out the repository
      - name: Checkout Repository
        uses: actions/checkout@v3

      # 2. Set up Python
      - name: Set up Python
        uses: actions/setup-python@v4
        with:
          python-version: '3.11'  # Adjust as needed

      # 3. Install dependencies
      - name: Install Dependencies
        run: |
          python -m pip install --upgrade pip
          pip install sqlfluff  # Add other deployment tools as needed

      # 4. Apply SQL Migrations
      - name: Apply SQL Migrations
        env:
          DB_CONNECTION_STRING: ${{ secrets.DB_CONNECTION_STRING }}
        run: |
          # Example: Using SQLFluff to fix and then apply migrations
          sqlfluff fix ./sql
          sqlfluff lint ./sql
          # Replace with your actual deployment commands
          bash ./scripts/deploy-sql.sh

      # 5. Create a GitHub Release (Optional)
      - name: Create GitHub Release
        if: github.event_name == 'release'
        uses: actions/create-release@v1
        with:
          tag_name: ${{ github.ref }}
          release_name: Release ${{ github.ref }}
          body: |
            Changes in this release:
            - Feature A
            - Bug Fix B
        env:
          GITHUB_TOKEN: ${{ secrets.GITHUB_TOKEN }}
Explanation of Workflow Steps:
Checkout Repository: Clones the repository to the workflow environment.
Set up Python: Sets up the required Python environment.
Install Dependencies: Installs necessary tools for deployment, such as sqlfluff.
Apply SQL Migrations: Executes SQL scripts to update the production database. Replace the example commands with your actual deployment scripts.
Create GitHub Release (Optional): Automatically creates a GitHub Release when a new release is published. This can be used to tag deployments and provide release notes.
In simple words, CD is a process that we want to run after code review is done and we are merging the code. We want to deploy code to the production and let GitHub Actions to do this automatically.
By integrating these practices and tools, you create a robust and efficient development pipeline that ensures high-quality SQL code and reliable deployments.

Do I really need to know all of this if I am a data analyst?
You might be a bit shocked with complexity of the topic. But it only seems complicated and in reality quite easy. At my free data analytics course I have a dedicated Module 0 about engineering practices for data professionals:
setup GitHub
setup VSCode IDE
setup IDE
learn about docker containers
My point is simple - every organization is using git systems and strive to have good quality documentation and code. I call this engineering excellence. For data roles this is huge benefit and competitive advantage. Sooner you start to use it, sooner you will start feeling career benefits of this simple and useful knowledge.
Just try to use git daily for anything your do!
SQL Style Guide
But how do we write SQL queries that are easy to read for code owners and reviewers, while also staying compliant with the most common README and documentation standards?
Since our key audience uses SQL daily at work, it’s important to ensure our code is clean, consistent, and maintainable. In this guide, we’ll dive deep into SQL style best practices, covering everything from formatting to naming conventions, to help you produce high-quality, readable code that aligns with industry standards.
Formatting
Uppercase: Use uppercase for the SQL keywords
SELECTnotSeLeCt:)Line Breaks: Place each major clause (
SELECT, FROM, WHERE, etc.) on a new line.Commas: Place commas at the end of lines, not at the beginning.
White Space and Indentation: Use white space and indentation effectively to enhance the readability of your code.

Linters
Most of the time, nobody writes code with all these formatting rules in mind because linters handle that for us! Who has time to uppercase all the keywords?
Linter – is a tool that analyzes your SQL code for potential errors, adherence to coding standards, and best practices. Linters can identify syntax errors, style issues, and potential performance problems, and they often provide suggestions for improvement. Usually they are included into CI/CD process we discussed before
Some of the most popular ones:
Structure
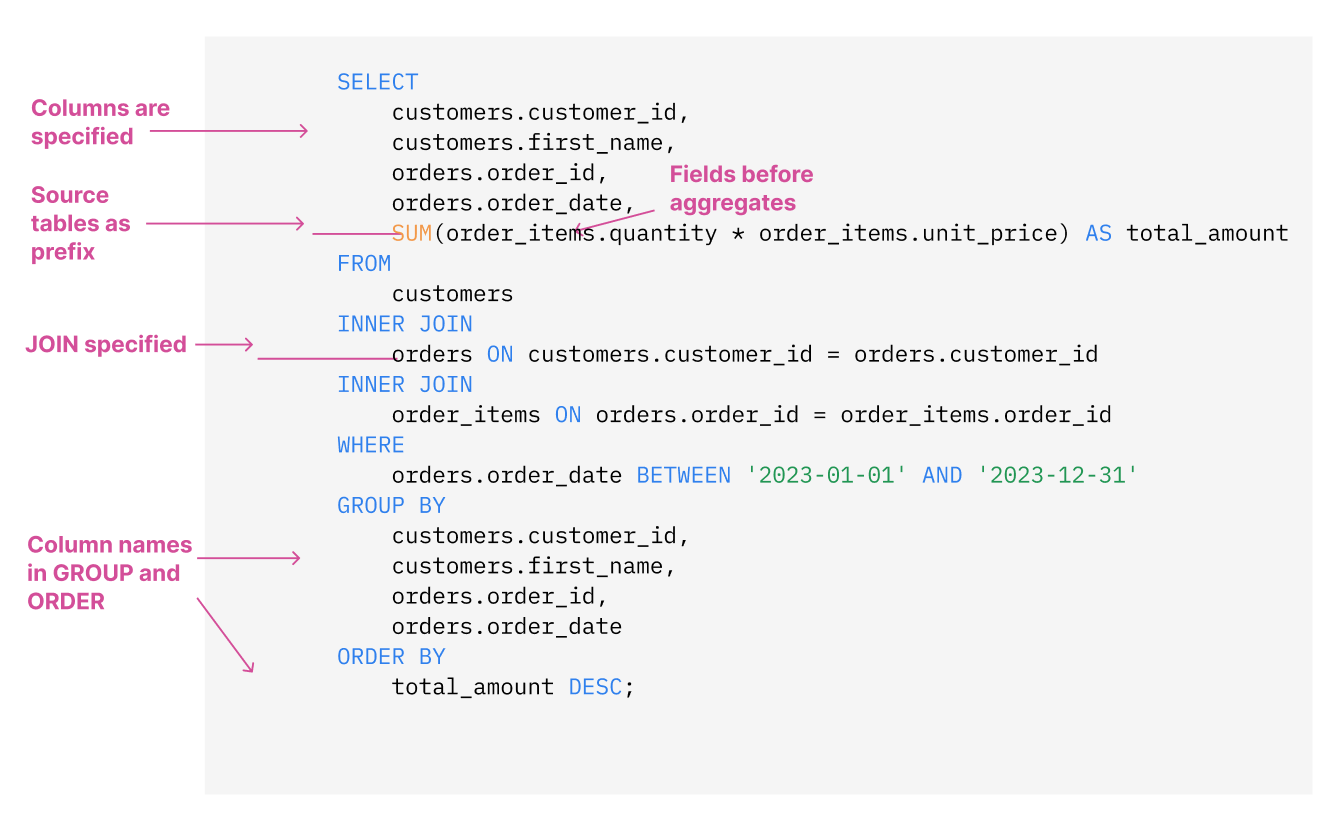
Avoid
SELECT *, always specify the columns you need in the query.Fields should be stated before aggregates and window functions.
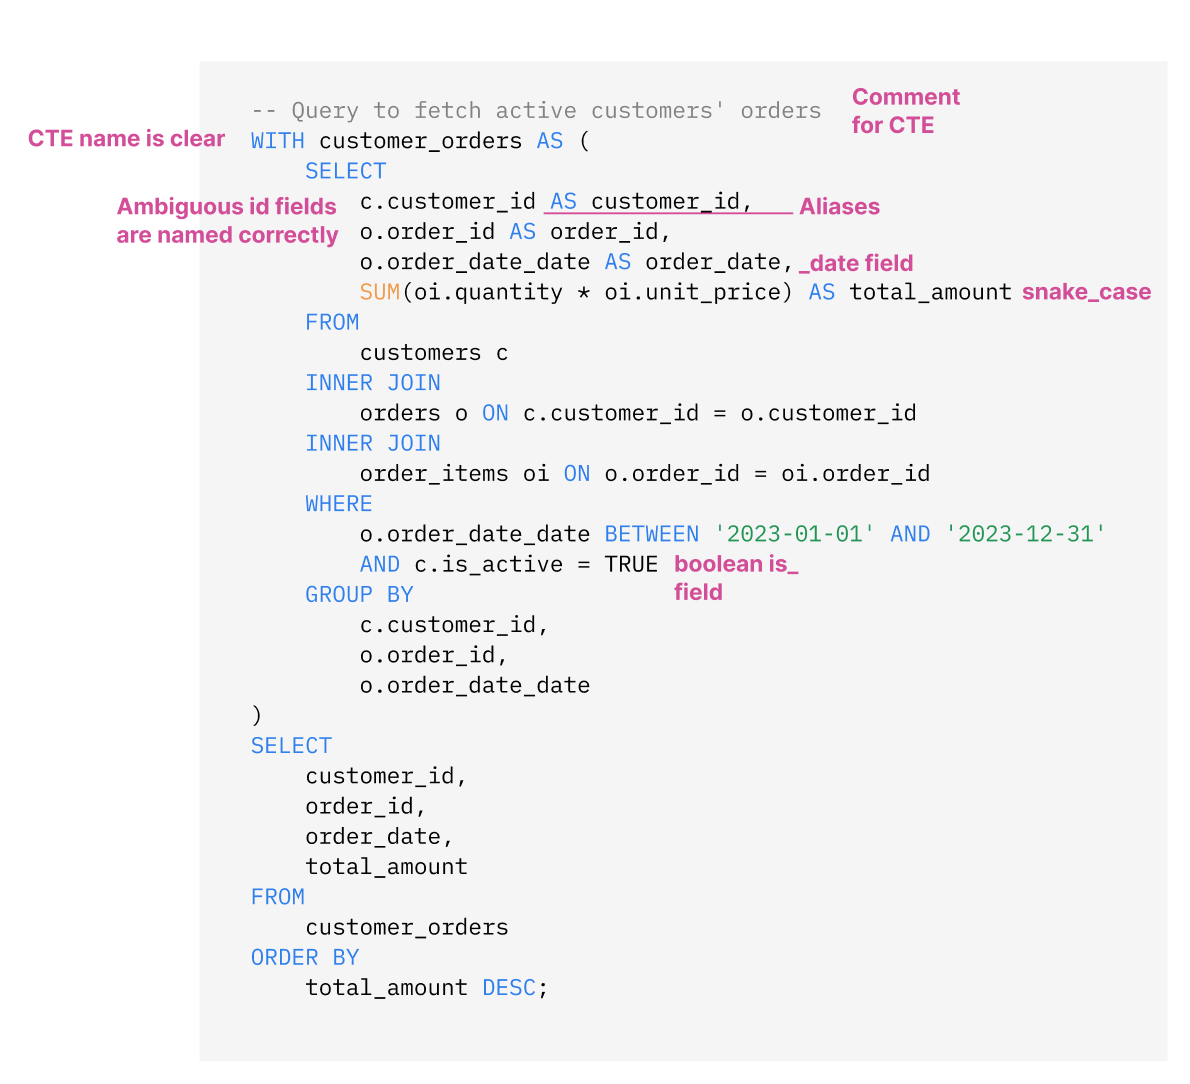
For complex queries, give preference to CTEs (Common Table Expressions) instead of Subqueries. They are much easier to read and decompose.
Avoid using column numbers in
GROUP BYandORDER BYexpressions; instead, use column names. It can be tempting to just writeGROUP BY 1,2,3but please leave it for ad-hoc, not production code.Always use explicit join syntax. Prefer using the
JOINkeyword along with theONclause to specify the tables' relationship explicitly, rather than using theWHEREclause to implicitly define the join condition. Also specify theJOINtype,INNERJOINinstead of justJOIN.When using multiple joins, always prefix columns with their source table names.
Naming
Use a consistent case for identifiers (table and column names, parts of CTE). Better to use lower case.
Use snake_case over other naming conventions. This is smth you should agree on inside your team but most of the time snake_case is easier to read than camelCase or kebab-case.
Aliases: Use short, meaningful aliases and always use the
ASkeyword. Always add aliases to ambiguous field names, like id, type, date.Boolean field names should with
is_, has_to clearly show that they represent a true/false value. They should also reflect the positive state of the condition:is_activeinstead ofis_not_activeTimestamps and date fields should end with
_tsand_dateaccordingly.
Comments
Always comment parts of the query with complex logic. Especially, unobvious filtering, logical cases, CTE’s. Examples: pivoting, complex CASE/IF expressions, metrics calculations, CROSS/FULL JOINS.
-for single-line comments... */for multi-line comments
Other SQL Style Guides:

 | A guest post by
|